
John Paul is one of those kids that zeroes in on something and it takes over his world. He eats sleeps, breathes, and thinks it until he's understood everything he can on the topic to his satisfaction. He's had a passion this past year for medieval history and warfare. Last summer found him making a huge wooden catapult, trebuchet, and ballista for the yard. (And, I might add, I graciously squelched my inclination to not freak out about the mess or what the neighbors must think). He just finished a huge project of building real metal chain mail and for a few weeks he's been wearing it almost constantly. I love this kid. He wanted to share here about this latest project of his and (checking off history/English/writing/photography/media) I'm letting him. So today, I turn it over to him...

For the past few months I’ve been
working on making a hauberk of chain mail.


It is made entirely out of steel wire
rings. I estimate there are about 6000
rings altogether. After watching a few
videos on YouTube I figured out how it is done. I made the rings by wrapping steel wire around a
wooden dowel with this machine that I made with a few pieces of scrap
wood.

The dowel, which is ⅜ in.
thick, goes in the bigger hole. The wire goes
through a ⅛ in. hole in the side. It is
then bent 90° and pushed into a ⅛ in. hole in the dowel.

I bought the wire from Tractor Supply with money from Christmas. It's 14 gauge galvanized steel electric fence wire that was sold for thirty dollars.

A drill on low power is
attached to the other end of the dowel.
As the drill spins, it winds the wire up into a spring. The spring is then slid off the dowel and a
pair of angle cutters is used to cut it up into little rings. Those rings can then be bent and joined together
to form chain mail.

Here’s a video on how I make the rings:
{I apologize for poor video quality. It's much clearer on my phone but I'm not sure how to fix that here!}
{I apologize for poor video quality. It's much clearer on my phone but I'm not sure how to fix that here!}
Putting the rings
together is pretty easy once you get the hang of it. There are many different ways you can do it,
but I start by taking one open ring and
putting two closed rings on it. Then I bend
it closed with pliers and take another open ring and put the two closed rings
on it. Then I put two more closed rings
on it. I continue like this until I have
a chain as long as I want then I take a few of those chains and join them
together with new rings. I was using a
different method but I switched to this method because it was easier.
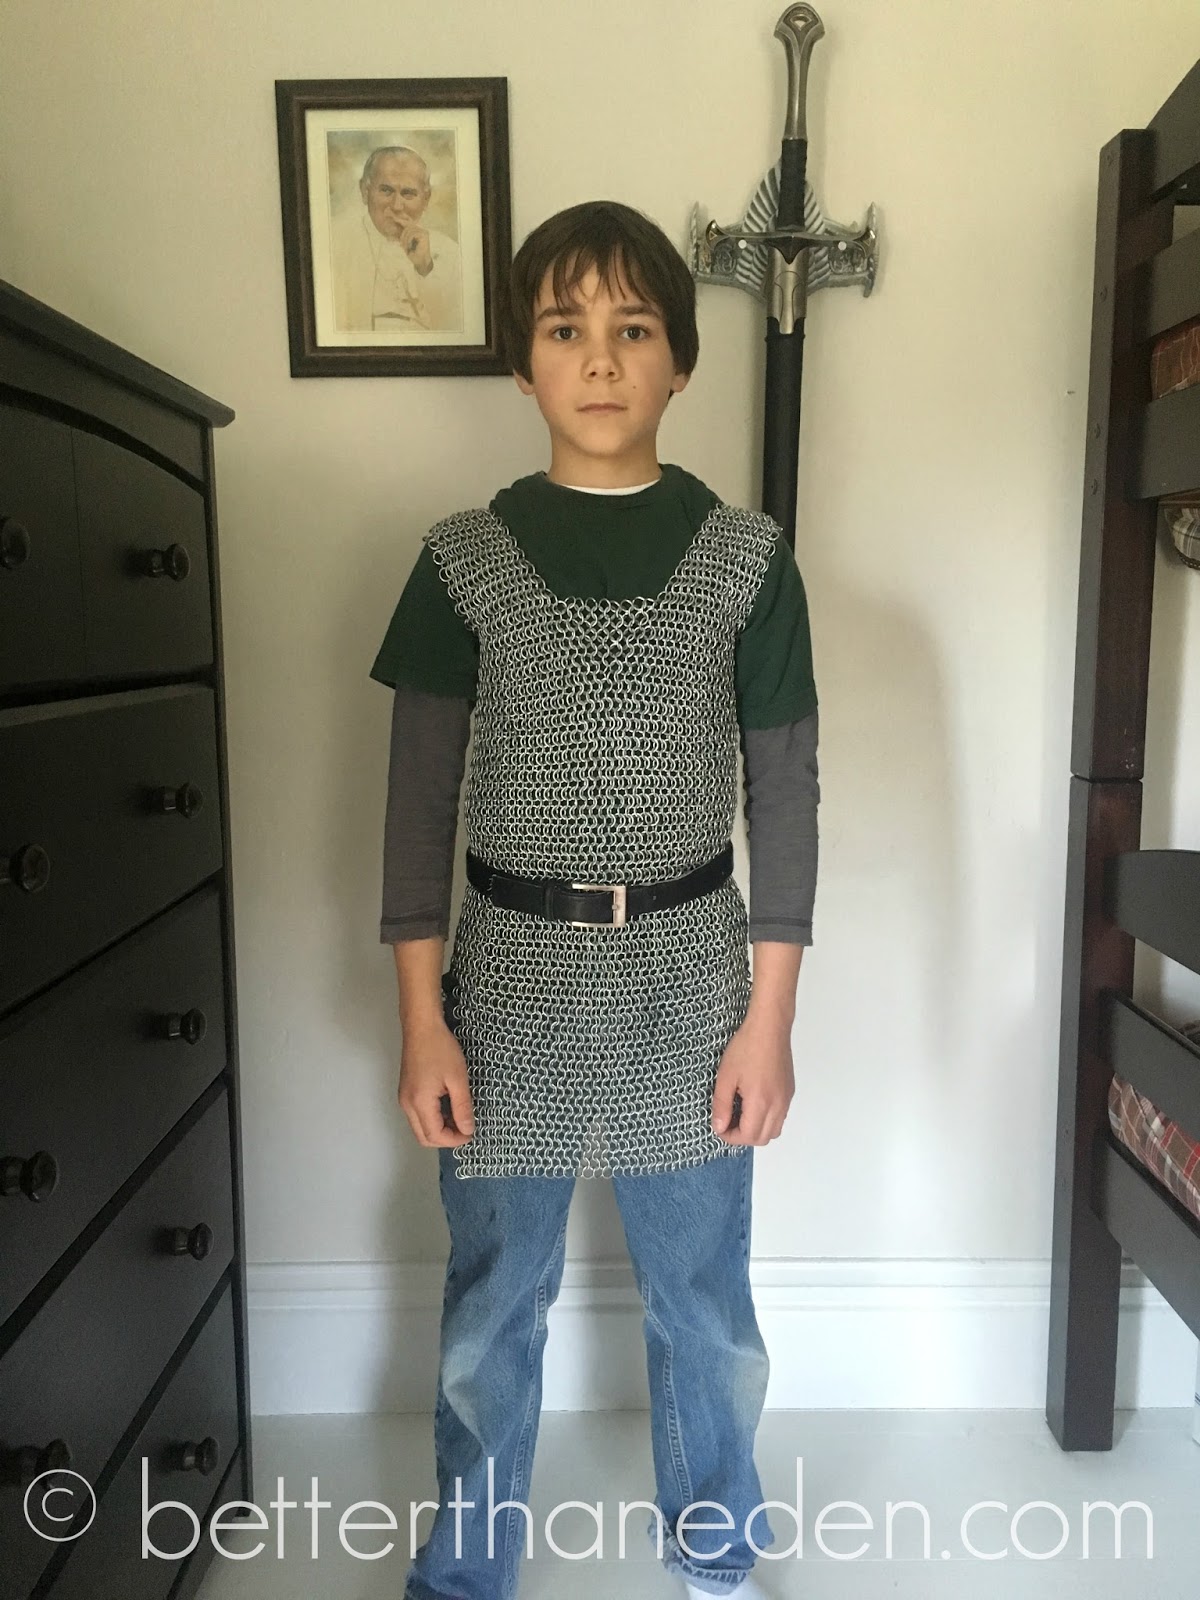
I had to figure out how to make the correct pieces and them fit them all together to be a hauberk. Here it is completed and laying flat.
I had to figure out how to make the correct pieces and them fit them all together to be a hauberk. Here it is completed and laying flat.

The hauberk is 80 rings tall and 40 wide. I made it in rows of 8 rings. For the front I started by making a strip 80 rings long and attaching a strip 64 rings long to it. Then I attached two more 64-ring strips to it. I made another 80 ring long strip and attached it onto the rest. Finally, I added two triangles. The back was pretty simple since it was just a big rectangle. Here’s a picture of the front divided into the segments that I pieced together.

After joining it all together I have a
complete chainmail hauberk. It took
about a month to make and it is about 15 lbs., though when you have it on it
only feels like 5 lbs. Making medieval
things is one of my favorite hobbies. I’ve wanted to have a suit of
chain mail for a while, but all of the suits online were crazy expensive and too
big. A complete chain mail hauberk can be
over $100 on Amazon. I found by making
my own chain mail I was saving myself a lot of money. I bought a quarter mile (1,320 feet) of wire
for $30 but I only ended up using half of it.

The next project I’m working on is a
rope powered medieval catapult. If you
have any questions about how I made the hauberk, please feel free to leave them
in the comments and I can try to answer them.


Very nifty & clever!
ReplyDeleteI made myself a hauberk & coif some years ago, but I didn't make my own rings so it wasn't as economical as what you did.
http://ponderedinmyheart.typepad.com/random_interesting_stuff/2008/08/a-little-postie.html
Ye should make a coif with the rest of your wire!
~Josiah
Wow, you and I should be friends. I bet we would have a lot in common! That coif is pretty cool! I like the brass fringe. I'm wondering whether or not to make that piece for the legs like you did.
DeleteThanks for sharing!
~John Paul
Very impressive!
ReplyDeleteThis is fantastic! Nice job, John Paul.
ReplyDeleteWow. Just wow. But are you going to build one of those machines to get the knight onto the horse ;) ?
ReplyDeleteThat would be really neat! A book I read recently said that armor wasn't actually as heavy as many people think it is and that knights weren't actually winched onto their horses. It said many knights even practiced jumping into the saddle without touching their horses! A knight's armor was actually only as heavy as a modern infantryman's combat uniform. Although winches may have been used later after guns were invented because armor had to be made thicker and heavier to stop bullets.
DeleteThanks for commenting!
~John Paul
I'm agreeing with Rosie. That's fantastic John Paul! I will be showing my sons what you have made. You've done a really great job!
ReplyDelete
ReplyDeleteWell done, John Paul!
Well done John Paul!! Extremely impressive!!
ReplyDeleteTruly you could be a younger brother of my three oldest lads, they've been making chain mail for years, sent them your link, I'm sure they'll enjoy it.
You've taken me back down memory lane remembering when they used to make medieval weapons too.
Keep on creating! :-)
Thank you! I am currently working on a catapult, a trebuchet, and have plans for a blacksmithing and aluminum casting forge for weapons.
Delete~John Paul
Oh my! Years ago my boys made a catapult and their mates made a trebuchet. Lots of fun. But the blacksmithing is taking it up way several notches!! Recently one of our homeschool dads here went to an auction and unexpectedly found and bid on a whole blacksmithing forge, tools etc! He's rather chuffed.
DeleteI had a reply from one of my lads about your post. X (19) says "I love it, he did a really good job on getting the links to all be the same direction as that is one of the hardest parts, do you know how old he is? Is he the same age as when we did it do you think?"
I'm eleven, turning twelve in June. My mom says that you guys live in Australia. I wish we lived closer. I bet your sons and I would get along really well!
Delete~John Paul
John Paul,
DeleteMost impressed! We are indeed blessed to live in Australia, I'm certain you would have lots to discuss with my boys. I'll see if I can find some photos in my archives of their weapons and email to you, though I didn't take as many photos then.
All I can say is wow! That's a lot of persistence and hard work! My baby boy is only 6 months but I hope he finds a passion like yours!
ReplyDeleteFit for an elvish prince!
ReplyDeleteImpressive! Awesome Job, John Paul!
ReplyDelete